Marvelous Money: Tracking your budget with Google Docs
Today is the day! The day I’m going to walk you through exactly how John and I track our budget. By the end, you might think I’m a genius, or you might think I’m absolutely insane. Maybe we’ll take a poll :)
The reason I say that is because it is not the simplest system (at least on the surface), but it works very well for us. And that’s the point — if there’s one thing I’d like for you to take away from these posts, it’s to find a tracking system that works for you, and stick to it. It might take several tries to find a system that is aligned with your strengths and guards against your weaknesses, but once you find it, you’ll be golden. Seriously, if you can stick to a budget, I truly believe your life possibilities will expand rapidly in front of you.
Alright, on with it. Our system was custom designed by John on Google Docs. (To give credit where credit is due, it was inspired by a budget Jenna’s husband designed.) Let’s start by laying out a few pros and cons of our system:
Good for someone who:
— is incentivized by saving
— is a more natural saver than spender / likes to know exactly where her money is going
— likes to look at spending data over time
Bad for someone who:
— does not have an interest in record keeping
— is prone to overspending
There are a LOT of moving parts to our budgeting system, but I’ll walk you through them. John has put together a dummy copy of our budget for you all to use if you’d like, and it will probably help to open that doc in another tab so you can reference it while you read. To start using our dummy doc for yourself, open the doc, click on File –> make a copy, rename it if you’d like, then click OK. Remember to MAKE A COPY before you start entering your info, or else you’ll be editing the original doc and everyone will see your info! :)
Our budget is made up of several sheets — 100, to be exact. I know that sounds like a TON, but bear with me! The doc starts out with a number of aggregate sheets, then goes into the Person 1 section, then the Person 2 section, then the Joint section.
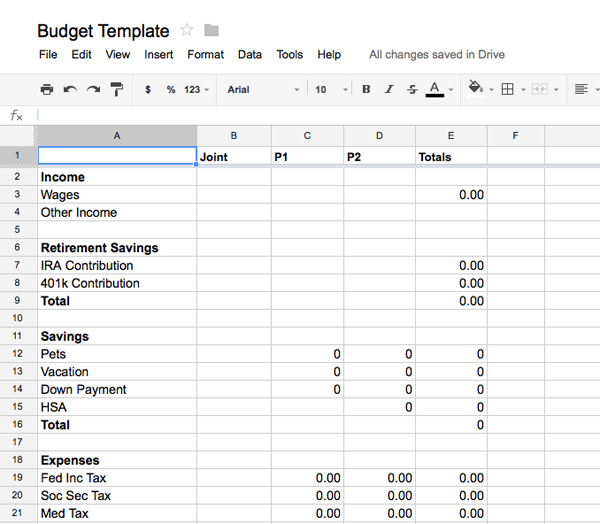
The first sheet in the doc is the Income-Savings-Expense Sheet, or ISE for short. This helps us see the big picture of all of our moving parts at once, and how they interact with each other. We actually enter very little manually into the ISE — most of the data is fed in from other cells through formulas. There are also formulas built in so that when we get to the bottom, all of our income, savings, and expenses are automatically calculated. When we’re establishing our budget for the year, the goal is to have just a small surplus in the “remainder” cell. Feel free to adjust our categories for your needs, but make sure that every Expense category has its own corresponding sheet.
The next two sheets — Expenses Actual and Income Actual — are also important for an overall look at things. Expenses Actual pulls in data from all of the other sheets to show you how your actual spending is lining up to your budgeted spending. The sheet nicely totals the difference for you at the bottom, and puts you in the red if you’re over. John also built in bar graphs for an additional visual aid. Again, this sheet populates automatically based on formulas, so it’s just for you to look at.
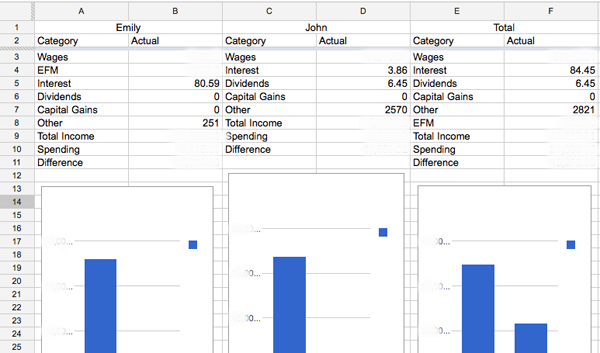
Income Actual shows you your actual income compared to your actual spending (a number drawn from the Expenses Actual sheet). Bar graphs are also included here. Again, all populated automatically. This is a (partially blurred out view) of our actual sheet:
You still with me? We’re through the most complicated parts!
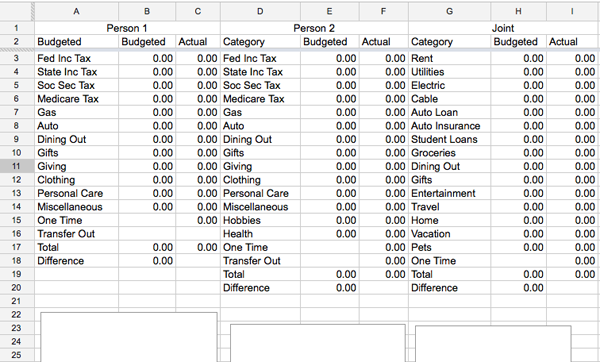
Our next sheet takes us into the Emily, or Person 1 section of the budget. Across the top runs all of the categories my expenses fall into — things like gas, dining out, giving, and clothing. All of my taxes — federal, state, medicare, and social security — are accounted for here, as well as my savings contributions — currently, vacation, down payment, and kitties. This is where you’re telling your money where to go, so if you want it to go to savings, then that needs to be laid out in your budget.
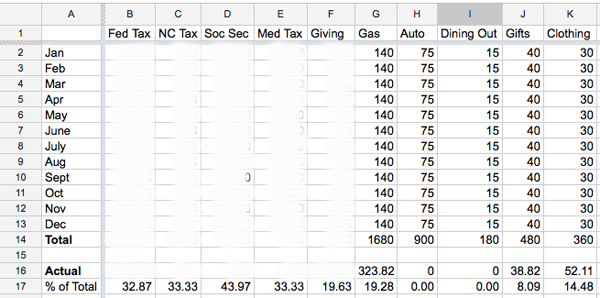
The total amount spent in each category for the year is totaled automatically by formula in the “Total” row. Beneath that, in the “Actual” row, the actual amount spent so far in the year is pulled from the individual budget sheets, and then beneath that, the percent of the total that’s been spent to date is calculated. So, you can see that I’ve spent $323.82 on gas so far this year, which is about 19% of my total budget of $1,680.
On to the next sheet, Person 1 Income. You don’t really need to worry about this sheet, because it will automatically populate from other sheets. Handy for showing what percentage of your income comes from what source (with the aid of a pie chart, of course).
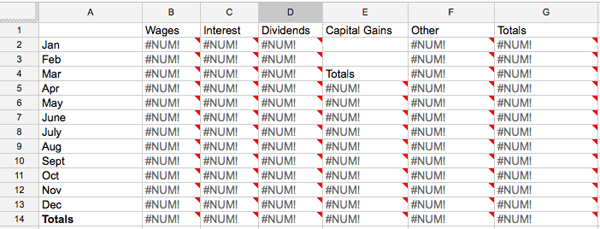
Don’t mind all the little NUMS – that’s just showing that there’s a formula for the cell that’s currently empty, because there’s no data in the dummy doc yet.
The next five sheets — P1-Wages, P1-Interest, P1-Cap Gains, P1-Other Inc, and P1-Dividends — are where you’ll enter your income data throughout the year. For example, if you get a paycheck, you’ll enter it in the wages sheet. It’s important to note here that you need to enter your GROSS wages, not your NET wages, since you’ll later subtract things like taxes as an expense. If you don’t, for instance, have capital gains, then feel free to delete that sheet. We use Other Income for things like an unexpected birthday gift.
Whew! If you’re still with me, you’re going to be golden from here on out, because this is where it gets easy. And really, all of the above is easy to use in practice, it’s just hard to explain when I’m not sitting next to you and we’re not looking at real numbers. The bulk of the sheets are simply to record your expenses. You’ll want to customize these sheets to whatever your expense categories are.
The first four expense sheets are the items that are deducted from my paycheck every month — federal income tax, state income, social security, and medicare. For P2, we also have sheets for 401k, HSA, long term disability insurance, and life insurance. Obviously, feel free to add or subtract to customize things for your situation! If you’re not used to tracking these numbers, you should be able to find them on your pay stub.
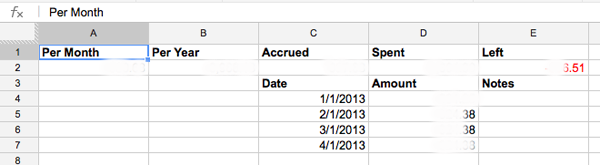
Now is as good a time as any to explain the basic premise of our budget. Once you’ve set the amount to be spent in each budget category per year (in either your personal budget sheet or the joint budget sheet), the formulas will automatically divide that number by 365 to get the amount of money that accrues per day. The daily amount will add up in each sheet’s “Accrued” cell. Whenever you spend money (by entering the individual transactions in the date/amount/notes cells), the total amount of money spent will add up in the “Spent” cell. If Accrued – Spent is a positive number, then the text will be black; if it’s negative, it will be red. Instead of starting with $30 in my dining out budget, I start with nothing, and the amount in the budget grows day by day. Instead of diminishing, our budget grows!
Another element that’s key to our budget is that we almost NEVER pay with cash, because cash is hard to track (unless you’re incredibly diligent with your receipts). Checks, credit cards, and debit cards are easy to track. Obviously, credit cards must be paid off in full each month for this system to work; the subject of credit cards is deserving of a post in itself so I’ll leave it at that for now.
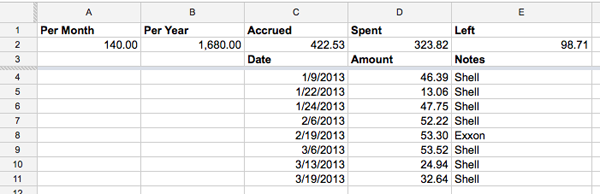
The remainder of the sheets in the P1 portion of the doc are for expenses that aren’t static, like gas, clothing, etc. Just enter these transactions as they happen. For example, this is what my gas sheet looks like right now:
Make sense? All of this repeats exactly for the Person 2 portion of the doc. If you’re a single person, just delete the P2 sheets and add the appropriate Joint expenses into your budget, too! Joint sheets follow the P2 sheets.
Here’s a brief rundown of my expense categories that aren’t immediately obvious:
Auto: Includes regular expenses like oil changes as well as irregular expenses like new tires or new brake pads. Since we never know what’s going to happen to our cars, we try to budget generously for this category, which means we often rack up a surplus.
Giving: Includes our pledge to our church as well as annual gifts to our college, donations to other charities, supplies for things like Operation Christmas Child, etc.
Personal Care: Includes toiletries, makeup, hair cuts, co-pays, contacts, etc.
Transfer Out: We enter our retirement account contributions here. We’re not actually “spending” them, but it’s money leaving our accounts that we’re making inaccessible for the moment, and we like to track where every dollar is going.
One Time: We use this for large, unexpected expenses that we’re paying for out of savings, not a yearly budgeted category. For example, in 2012 my one time expenses were the dress I rented for our friends’ wedding, my contribution to the house rental for my sister-in-law’s bachelorette, and John’s wedding present. Your one time expenses should be very rare, and not just a place to hide your non-sanctioned spending. As a rule of thumb, you should be able to count each year’s one time expenses on one hand.
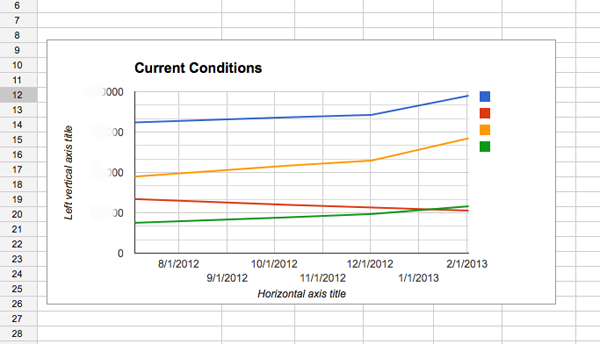
Almost there!! The last two pages might be a little confusing, but for us, they have been one of the biggest financial motivators at our disposal. They are the Net Worth and the Net Worth Over Time sheets.
To use the Net Worth sheet, plan to take stock of your financial situation with your partner every two months or so. Put those dates on your calendar! On the designated days, go through every one of your accounts — checking, savings, student loans, car loans, IRAs, 401ks, HSAs, the works — and note the amount in each. For debts, note the outstanding amount (you can usually do this by signing into your online account or by calling your lender’s automated phone system).
After the formulas do some work for you, enter the required numbers — Assets, Liabilities, Net Worth, Net Worth ex Retirement — into the Net Worth Over Time sheet. Once you’ve been doing this for a few months, you’ll use your data to build a graph. Ideally the line will trend upward (if you’re gaining assets and shedding liabilities), which should provide even more inspiration to keep on the straight and narrow financial path! Here’s what our graph looks like since August 2012:
Friends! How are you feeling?? Have I totally confused you? Excited you? PLEASE let me know what you think and if you have any questions at all! There’s certainly more detail I could have added in, but this post was long enough already. Remember, you can access the dummy doc here!
And, take heart! If you don’t think this system is for you, a special friend will be visiting us next week to offer up another solution.
P.S. I would be COMPLETELY remiss not to acknowledge John here, who created our entire budget system, made the dummy doc for y’all, and diligently proofread this post to cut out the maximum amount of nonsense talk! He is truly marvelous!!


Wowee! You have got this whole budgeting thing down pat! Your system sounds awesome, and like something I should definitely be doing. I’m not sure if I’m being silly but I can find the link to the Google doc tho?
I sent this to my husband, I think he will enjoy looking through your version to see what you guys did. My blog is such a mess, I’m so sad that all of the images from that post are lost! I just did a quick fix so it’s not so confusing when your readers click over.
Also, what I didn’t write about in our post is how we enter the information into our spreadsheet. We use credit cards exclusively (any cash purchases are logged on my iphone using Cash Tracker and then entered into Mint manually) and categorize it all on Mint.com. Then we take the information and export it into our Google Doc and it gets categorized automatically. If you’re interested in hearing more about how it works I can see if S has time to email back and forth with you about it. It looks like you guys already have something great going on though!
As someone who falls under your “Bad for someone who doesn’t like record keeping and is prone to overspending” category – WOWEE. This is an amazing thorough spreadsheet. If anyone wants help on the record keeping and over-spending I echo Jenna’s use of mint.com. It helps by doing most of the record keeping for me AND sends me alerts if I am close to our max budget in a category, low balance, etc. It also is flexible enough to work for someone like me who is not blessed with a predictable, steady paycheck. Budgeting two freelancers is the pits, and mint.com has been a blessing!
I think this is awesome!!! I love the budget growing vs shrinking!! And I have to say that I’m a major numbers nerd by day so it’s not surprising that a huge excel spreadsheet appeals to me. We use mint for ease but I have various spreadsheets built too. I’ll have to experiment with your doc when I’m not on my phone!! Thanks for sharing!!!
YAY! Thanks Emily, and high five, John!
I love this!! You’re right- the net worth tracker would be a total motivator. I’m curious- do you think it would still work (the formulas) if I just simplified and only used the “joint” tabs rather than splitting my husband and I out by P1 and P2?
@Jenn Yes, absolutely! Just make sure to add in whatever categories you’re missing from “joint” once you delete the P1 and P2 sheets. You’ll need to do a little updating on the ISE sheet, too, but it should work just fine!
Hello, I just found this blog, and I am amazed! I already copied it for my own spreadsheet as we are trying to stay on budget, and I am such a nerd for numbers! I have one questions which involves the accrual formula which I don’t really understand? I tried the formula but it didn’t seem to work? ALthough Im not quite sure how that works exactly! Thanks!
Yea, so this Google doc is a little too complex for my little journalism brain (my husband is the engineer, lol) but I am starting the envelope system today and excited to see how it turns out at the end of the month!
xoxo
Is it still possible to access the dummy Google Doc? This is such a great way to keep track of your budget and I LOVE Excel so I’m hoping to get a good system going.
Hi there
i found this link from the comment left on Design Mom. Is it possible to access the dummy document? I’d love to give it a try. I’ve sent a request for permission.
Thanks in advance
Christine
[…] It can be hard to know where to start when setting a budget, but there are free apps like Mint and Google Doc templates to help you to set your […]
I LOVE this spreadsheet—thank you so much for sharing! But, it looks like the dummy doc might have gotten messed up sometime over the past several years. Wondering if you have any idea where to find a similar template? I’m not sure I’m good enough at Google Sheets to fix it myself!